On this page, we will go over the process of getting a new video recorded, edited, and posted for students to view. We will also go over the default settings for a folder in UICapture.
For more details about additional features available in UICapture visit the How-to Guides page. Also, please reach out to the ITS Help Desk or your local UICapture support team, and we will help get you started.
UICapture Defaults
Course and Department Folders
Each folder has a default configuration that works for most courses. You may want to turn off the RSS feed if you want students to only watch your videos from within ICON or UICapture. You also may want to turn off the comments if you students will respond via a discussion forum or other ways.
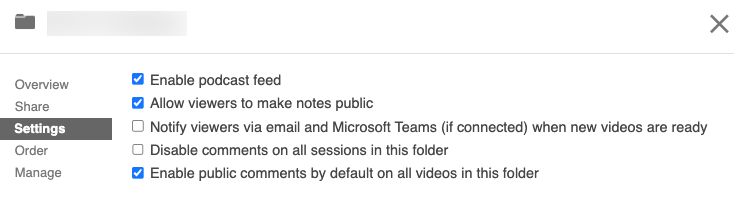
Folders in Panopto will be configured as follows:
- Comments are on.
- Notes can be made public.
Students/Viewers will not be notified when new content is added.
Sharing
UICapture/Panopto sessions and folders can be shared in a variety of ways. It is important to know how your content is currently being shared, and how you might change it.
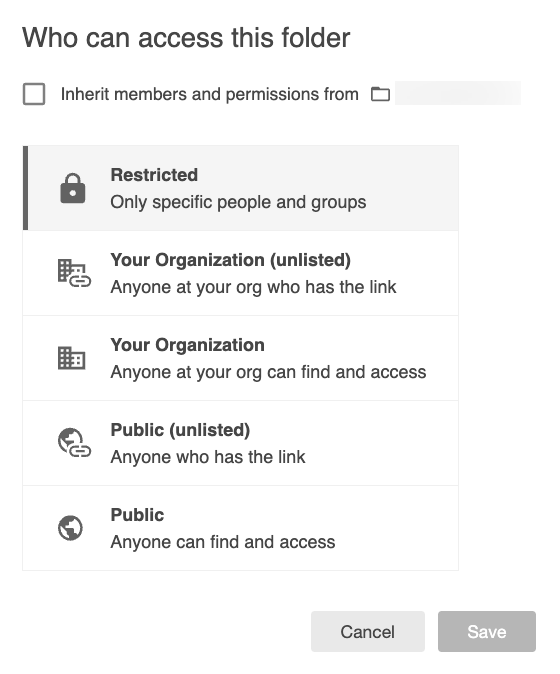
- Specific people*: Shares the folder with specific people as publishers, creators, or viewers. The integration with ICON will handle sharing with these specific people.
- Anyone at your organization with the link*: Enables viewing access for anyone who has a HawkID and a link to the session. This will make the video hidden from other users in the list of Everything. This unlisted state means that the session won't be discovered by anyone browsing in UICapture. It can only be accessed through a direct link after signing in with a HawkID.
- Anyone at your organization*: Enables viewing access for anyone who has a HawkID. The video will be indexed under Everything for all users.
- Anyone with the link: Enables viewing access for anyone on the internet, no sign in is required. This unlisted state means that the session won't be discovered by anyone browsing in UICapture. It can only be accessed through a direct link with or without a HawkID.
- Public on the web: Allows anyone on the internet to find and access the sessions.
* Needs to be used for video quizzes to work properly.
Please be mindful that sessions are capable of inheriting permissions from their parent folder but inheriting can be changed. It is important to check each session for its permission setting.
Course and Department Folders
All content will be restricted to specific users. This can be made less restrictive if you wish, but only named users will be allowed to watch content by default. Learn more about sharing folders from Panopto support.
My Folders
You cannot share your entire My Folder with another user, if you need someone to work on content with you, you will need to request a department folder from your local UICapture contact or the ITS Help Desk.
Individual sessions can be shared with users for review, we recommend storing content that will be shared long term within a department/course folder. You can read about sharing individual sessions from Panopto support.
Add UICapture to the Navigation Menu in an ICON Course
- UICapture is available by default within ICON. To have UICapture appear in the navigation menu in an ICON course, click Settings in the course navigation menu. Next, click the Navigation tab on the top of the Settings page.
- Scroll to the bottom of the Navigation page until you find UICapture. Click on the vertical ellipsis, located on the right side of UICapture box. Select Enable and then Save.
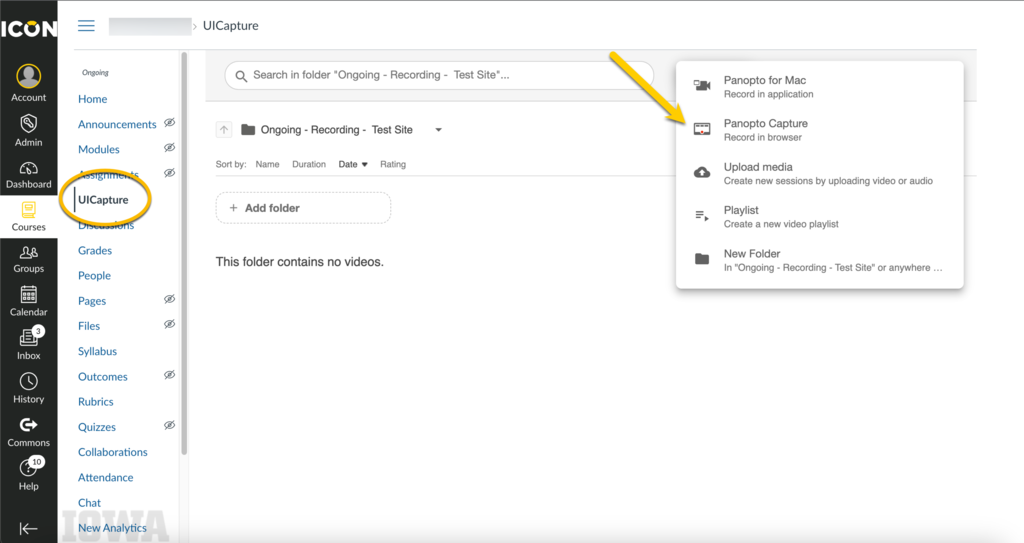
To access your unique UICapture course folder and create or upload videos to your ICON course, click UICapture in the course navigation menu.
Recording
Starting the Panopto Recorder in ICON
- From with the sidebar tool in ICON, select the Create drop down from the top of the window.
- Select Panopto Capture from the list in the drop down.
If a pop-up appears asking for permission to open the Panopto Recorder, select Open Panopto Recorder.
You may want to avoid turning on this tool in these cases:
- You want to manually control the list of individuals that have access to the folder and its contents.
- You want to use another folder for the content of this course.
- You want to use Modules in ICON to release the videos to your students.
If you do not want to use the side-bar tool, you can launch the Panopto Recorder from the Rich Content Editor and Modules in ICON. To learn more, view directions in the Record section.
If you do not want to use the integration between ICON and UICapture to share and manage content, you can record directly in UICapture using the Create drop down and the Browse menu available to the left. Contact the ITS Help Desk for a new folder to share with your audience. Everyone has a My Folder in Panopto, but we recommend using that for sessions that have not yet been shared. Storing sessions in collaborative locations can make it clear where materials are coming from and which department they are used in.
Recording with the Panopto Desktop Recorder
The guides on Recording for Windows and Recording for macOS users are available on the Panopto Support site.
Primary Audio and Video
Panopto requires at least an audio source to be recorded. Ideally, you would select a headset microphone for this. In classrooms, some will have a USB microphone installed and positioned on the lectern. This device will generally be listed as Microphone (USB audio CODEC). If the room has a lavalier or another type of microphone, you can use that device by selecting it from the Audio drop down. Here is a list of some of these devices installed in rooms:
- ATR2USB
- AV Bridge
- MediaPort
- Vaddio
- BIAMP
There are other devices available on campus, depending on the space. After you have configured your audio, you can move on to video. In classrooms, you can select the camera that is either wall or ceiling mounted or the USB camera that is mounted to the lectern. If you do not wish to appear on camera, you can skip primary video.
Secondary Video
Secondary sources are things like your PowerPoint or if you are sharing something on screen. If you are recording a PowerPoint, we recommend capturing the screen that the PowerPoint is shown on and checking the Capture PowerPoint box. This will ensure that everything you are sharing is captured accurately.
You are given the choice of quality for your recording, we recommend using either High or Ultra for the Primary Sources. For the Secondary Sources, we recommend a resolution of 1280x720 or above, frames per second (fps) of 15 or above, and a bitrate (kbps) of 1500 as a minimum. The settings for the Secondary Sources will affect each other, so if you raise one you may notice that the other raises automatically.
If you get a notice that your computer is running out of resources or if recordings are choppy, lower some of these settings to see if you are able to record. The Secondary Sources will also change with the content you are recording. If you are recording things with a lot of motion, raising the frames per second can help the video remain clear. but it will negatively impact the power you need when recording and the network bandwidth your students need when playing the videos.

When can I close the Panopto Desktop Recorder?
While the Panopto Recorder will process in the background, we recommend leaving the recorder open. When your recorder says Processing under the Status, you can close your recorder.
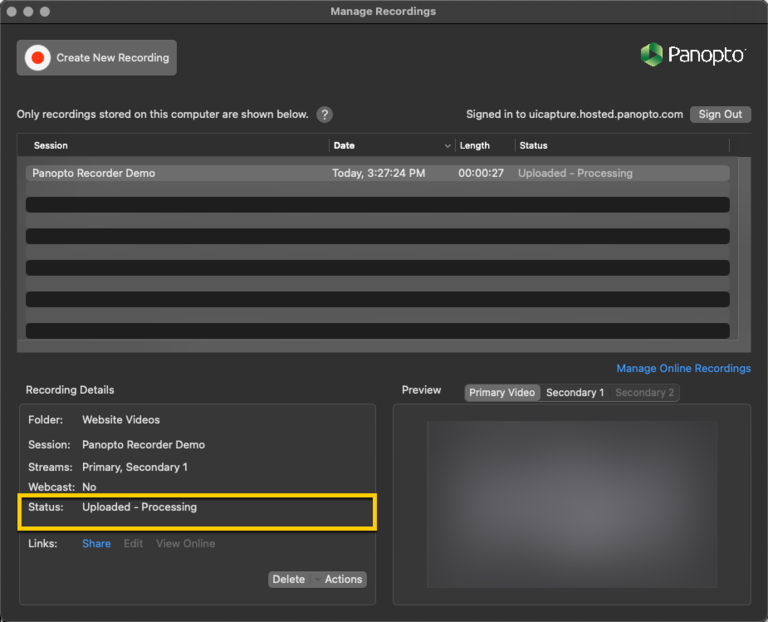
You can use the four links (Resume, Share, Edit, View) to take you to the location of the session on the web.
Recording with Zoom Cloud
If you are using Zoom to deliver content to your course synchronously, you can record to the cloud and have that recorded lecture automatically moved to UICapture.
Privacy Considerations
When recording UICapture videos whether it be one participant or recording a class, it is important to redact any identifying information in a video to comply with FERPA regulations. To learn how to redact identifying information and other privacy tips, visit the UICapture Privacy Best Practices page.
Editing in Panopto
Trimming
The first step in the Panopto Editor is generally to trim sections out that you do not need. If you need to restart for a section or if you want to remove something, you don't need to scrap the entire recording. You can use the cut tool to trim either the entire section or only one of the Secondary Sources.
Adding ASR Captions
The Automatic Speech Recognition (ASR) caption provider is on by default for all new folders in UICapture. Content and folders created prior to May, 8, 2023, will remain uncaptioned until some action is taken to add ASR captions.
These ASR captions are also used to expand what users can search for within your videos. If a student wanted to search the course folder for all the times a topic was discussed in the lecture videos, they could look at their notes, or they can search your videos.
Adding a Table of Contents
If you need to amend what was captured from your PowerPoint or if you need to add a Table of Contents manually, that can be done quickly in the Panopto Editor. Click where you would like the entry to appear in the timeline and enter the text you want to be displayed to the left.
Sharing Videos in ICON
Players
Panopto uses two different players the Viewer and the Embed player.
Viewer Player
Panopto's Viewer is used when viewing content in the Panopto website.
Embed Player
Panopto's Embed player is used by default when content is embedded outside of the UICapture website.
This player is best suited for content that does not need to have webpages and YouTube videos included. Things like the table of contents, comments, and student notes will still be available as will video quizzes.
The embed player can be replaced with the full standard player if you need the full Panopto experience for a webpage. Please contact the ITS Help Desk if you would like more information on this process.