How do I add Elements of Success to a Course?
Instructors can now add Elements of Success to their own ICON courses.
- Click Settings in the ICON Navigation menu to the left of your ICON Course.
- Click Navigation in the menu across the top.
- Scroll down to the second list of items and find Elements of Success. Click the three dots to the right and select Enable.
- Elements of Success will now appear in the top list of items, which shows what will appear in your ICON navigation menu. You can drag to move it where you want it to appear in that menu.
- Scroll down to the bottom to click Save.
What is the difference between Default Setup and Custom Configuration?
Elements of Success offers two options to get started: the Default Setup and the Custom Configuration.
Default Setup
The Default Setup is recommended for most faculty. It is a quick option that includes the features your students need to reflect on their learning. It automatically includes all assignment groups, activities, and key goal-related action items. Grade estimation is initially disabled.
If you select this option, you can always go to Course Settings to edit your options, enable grade estimation or percentile rank, and make other adjustments to what data are presented for students.
Custom Configuration
Custom Configuration gives you the ability to tailor your dashboard to your preferences from the start. If you have used Elements of Success in the past and want to import your settings from a previous course, you will also want to select Custom Configuration.
In this setting, you are able to select which assignment groups are shown in Elements of Success, turn on grade estimation, select which goal-related action items are shown to students, and set up announcements.
How do I edit the Course Settings in Elements of Success?
The Elements of Success set-up lets instructors set their own settings, including Grade Estimation. It is possible to skip any step and come back to it at a later time. Is also possible to undo any settings - if you need help with setting up your course, please contact the ITS Help Desk to reach the Elements of Success team.
To get to Elements of Success set-up, go to your Elements of Success course and in the menu at the top, select Course Settings. Then go through these steps.
Import Settings
- If you’ve used Element of Success in the past, you can copy over settings from a past course.
- Check the settings you’d like to copy. If you aren’t sure, it is generally easier to copy past settings and make changes to them than set everything up from scratch.
- Select what settings you would like to copy, and click Copy Settings.
- If you haven’t used Elements of Success in the past, or don’t want to copy any past settings, click Next.
Assignment Groups
- Elements of Success will show you your assignment groups from ICON. Select all the assignment groups that will be considered in student grades (even if some don’t have grades in them yet.)
- This works best if you set up your assignment groups in ICON before you run the set up wizard. If you do make changes later, you can redo this step. Click Save to save, or Next to save and move on.
Activities
- Select the activities you would like students to be able to track their progress on. The default is to have all three checked, and we recommend only unchecking ones you know will not be helpful for your course. Click Save to save, or Next to save and move on.
Grade Estimation
- Choose what grade information you would like students to see initially. You can always change this later in the semester. You can select as many as you find useful.
- Show Total shows the number of points the student has compared to the total number of points available in the class. This is useful in most classes.
- Show Percentile Rank shows the student’s score compared to the rest of the students in the course. This is especially helpful in courses with curved grades
- Show Grade Estimation will take you to the Grade Estimation step at the end of the set up.
- If you select Show Grade Estimation, you can also set up new grade estimation settings.
- Set the Instructor to yourself.
- If you'd like to import a grade scheme from ICON, select Straight Scale and then Sync from ICON then once the grade scheme comes in, scroll down and click Save Estimation Settings.
- To set up a straight scale manually select Straight Scale at the bottom. (If you primarily use a straight scale, but curve a little at the end, stick with straight scale).
- You can use Grade Cut Points to set the minimum course percent to receive that grade (so potentially 93% for A, 90% for A-, etc.)
- Click Update Grade Estimation to save, then Next to move on.
- If your course is curved, select Custom Distribution at the bottom.
- Fill in the percent of the course that will receive each grade. So if 18% of the class receives an A, type 18% for A.
- Click Update Grade Estimation to save, then Next to move on.
- If you select Show Grade Estimation, you can also set up new grade estimation settings.
Goals/Action Items
- To add Action Items, select a Global Action item from the list on the left.
- To remove Action Item, select the red trash can next to an item on the right.
- To create custom action items, go to Create a New Action Item, type your action item under Goal Text and then click Create.
- To reset goals and action items for your students, click Start a new goal period.
Activation
- Look over the options you’ve selected.
- Under Course Status, you can select the Course Status.
- The default setting is Active to make the course available to students.
- Select Instructor Only if you only want instructors to see the information in Elements of Success. This will automatically revert to Active on Week 3 of the course. If Elements of Success is added after Week 3 and set to Instructor Only, it will become Active after one week.
- If you want to activate at a later date, you can Schedule Course .
- Click Save to finish.
- If you want to make changes, click Previous to adjust settings, then Next to get back to this page.
How do I set up my ICON gradebook for Elements of Success?
All of the information from Elements of Success comes from the ICON gradebook, but there are some differences in how Elements of Success uses that information to give students estimated grades. You can set up your ICON gradebook to ensure that Elements of Success works more smoothly and accurately.
Set Grade Policy to Manual
- Elements of Success gives students the most accurate view of their performance when grades for all students are posted at once instead of one at a time or in groups.
- The default status for ICON is to automatically post grades, so you'll need to set the course grading policy to Manual.
- When you have completely finished grading an assignment for all students, you can manually post grades.
Set Late and Missing Work to Zero
- Elements of Success treats missing grades as zeros, so if they are not set to zero in ICON, there could be a significant difference between how total grades appear in ICON and Elements of Success.
- Once grades are entered for all completed assignments, you can set the default grade for incomplete assignments to zero.
Other Gradebook Suggestions
- Set up assignment group weights early so they are visible in Elements of Success.
- If using the Grade Estimation feature, make sure you set up your Grade Scheme in Elements of Success to match the one in your syllabus. To set up your Grade Scheme in Elements of Success, contact the ITS Help Desk.
- Let your students know about your grading policies and how they could impact the way grades appear in Elements of Success.
- Setting a course so that students work at their own pace tends to not work well with Elements of Success. The program treats ungraded assignments as zeros, so if you do allow students to work ahead, don’t post grades until all students have a grade listed for that assignment.
How should I introduce Elements of Success to my students?
- Take some time to explain Elements of Success to your students and give them occasional reminders to check it. This can impact how useful the students find the tool.
- You can introduce Elements of Success as early as you’d like in the course. You can turn in on if you’d like students to start thinking about their goals right away or around the time of the first assessment, when most instructors turn on Grade Estimation or Percentile Rank.
- Let students know where they can find Elements of Success in your ICON course and what features you would like them to focus on.
- You can also give students quick reminders to check Elements of Success after major assessments. These may be in class, via ICON announcements, or both.
- Elements of Success can also be a useful during office hours or when working individually with students. It is a quick way to check student progress and show them what information to focus on.
How often does Elements of Success update?
Updates in Elements of Success are dependent on when grades are posted in ICON and when the last update cycle began. Typically, Elements of Success syncs with ICON every four hours, but occasionally a sync may be skipped for maintenance or other reasons. If your Elements of Success course has not been synced with ICON in over a day, please let the ITS Help Desk know.
How do Grade Estimation and Percentile Rank work?
- Elements of Success is designed to help students better understand their grades, and students report they find the Grade Estimation and Percentile Rank features to be the most helpful.
- Grade Estimation shows students their estimated grade based on the points currently available, category weights, and the course Grade Scheme. This works well in courses that do not have curved grades.
- Percentile Rank shows what percentile student scores fall into based on points available and category weights. This works best for courses with a grading curve.
- Since early formative assignments are often graded based on participation, we recommend waiting until the first major assessment before turning one of these features on, so students don’t see major swings in their performance initially.
How do I add custom course updates?
Custom updates can be created to apply to students that meet the criteria selected by the instructor. For example, after an exam, you can specify that students with scores in a certain range will receive a message letting them know they can retake the exam or use certain resources or strategies. The title, icon, and message in the update can be customized to fit the parameters of the update. You can also edit the course updates already in Elements of Success.
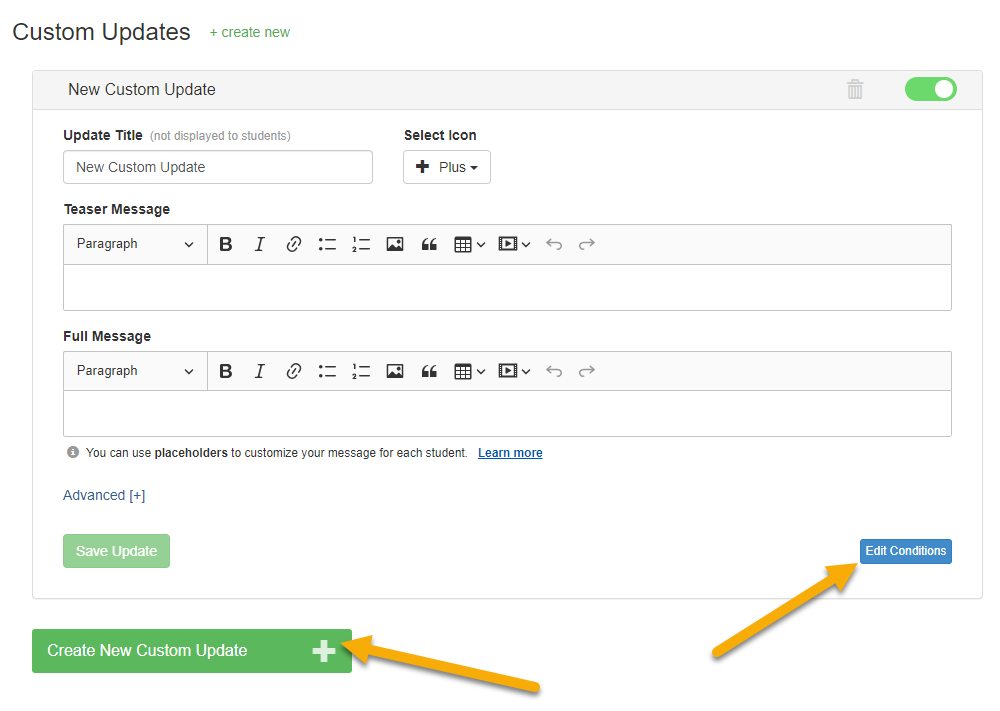
- Multiple custom updates can be created. Click the Create New Custom Update button to create more custom updates; each with their own criteria set by each course instructor.
- To set the criteria for the update, click Edit Conditions.
- After you have clicked on Edit Conditions, adjust the options to finalize the update.
- Enter a name for your conditional statement.
- If you have more than one conditional statement, you can choose to apply the condition to any or all the conditions.
- Choose percent rank, constant, grade category, or assignments.
- Click the blue box Preview Affected Students to see which students in your course will receive the statement once it has been saved.
- Click Save Conditions.
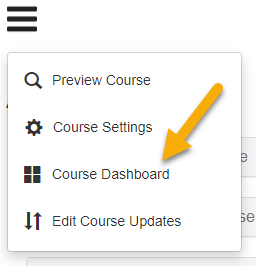
How do I use the Course Dashboard?
- To view the Course Dashboard, start in Elements of Success and click the three-line menu toward the top left of your Elements of Success window.
- Select Course Dashboard.
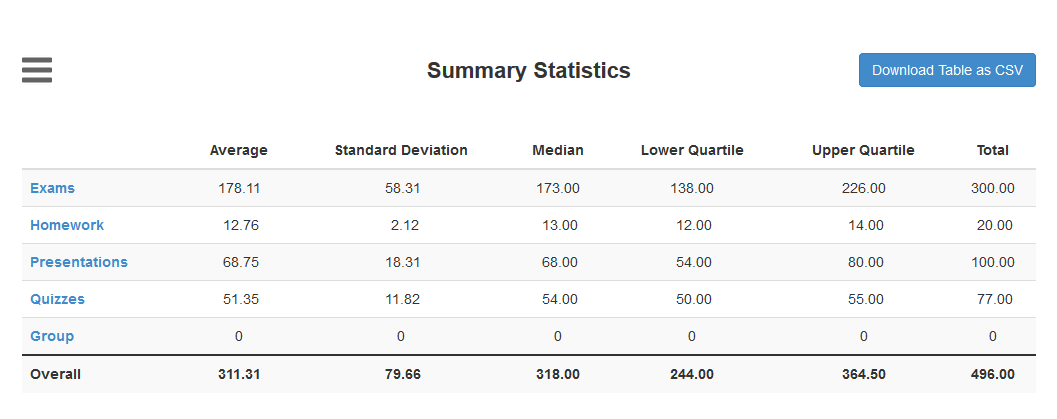
Summary Statistics
- The first section will be Summary Statistics, which allows you to see overall class results.
- The table shows the average, standard deviation, median, lower quintile, upper quintile, and total for each assignment group and for the course overall.
- You can click any of your assignment groups to the left of that table to see performance on individual assignments.
- You can download the results by clicking Download Table as CSV in the upper right.
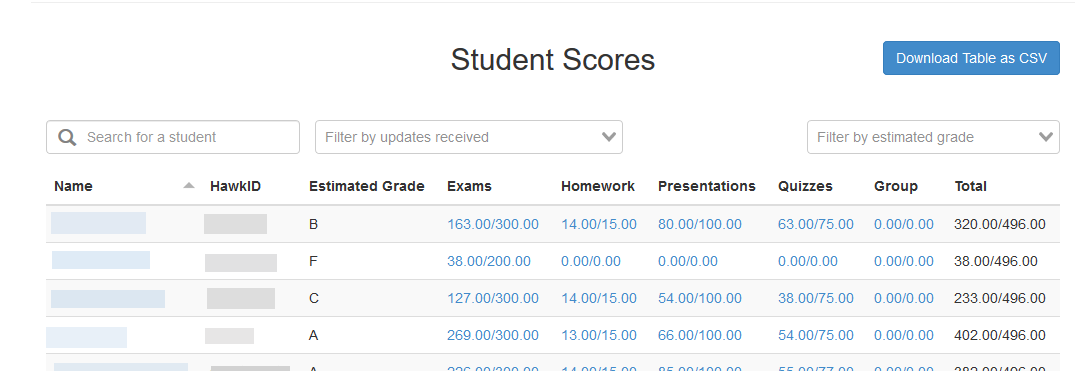
Student Scores
Student Scores allows you to see individual student estimated grades, scores for each assignment group, and their total for the class.
- To find a specific student, you can type their name into Search for a Student.
- Click on a student's name to go to that student's view of Elements of Success.
- If a grade scheme has been set up, you will see the student's grade estimation. Students can't see that unless that box has been checked in the Elements of Success course settings.
- You can also filter by what updates students have received and by estimated grade.
- You can click in the student's name or on their assignment group scores to get more details.
- Click Download Table as CSV to download this information.
- Just below this table, you will be able to see the percentage of students who have viewed Elements of Success for this class so far, and in the previous week.
How do I view Elements of Success as a student?
Elements of Success has a student view option that allows you to see what any specific student sees. This lets you check what is visible in Elements of Success and know what information they can access.
- Student View is also useful when working one-on-one with students during office hours or similar settings. You can quickly pull up that student's information on your screen to walk them through information about their performance in the course and show them how to use Elements of Success to monitor their grade.
- You will can't view a student's goals and action items under My Goals, even if you are impersonating them.
Accessing Student View from the main page
- Access Elements of Success from your course navigation menu.
- At the top left of the main page, you'll see a box that says HawkID/University ID.
- Type the student's HawkID or University ID number into the box and hit Submit.
- You will be able to see the student's view of Elements of Success.

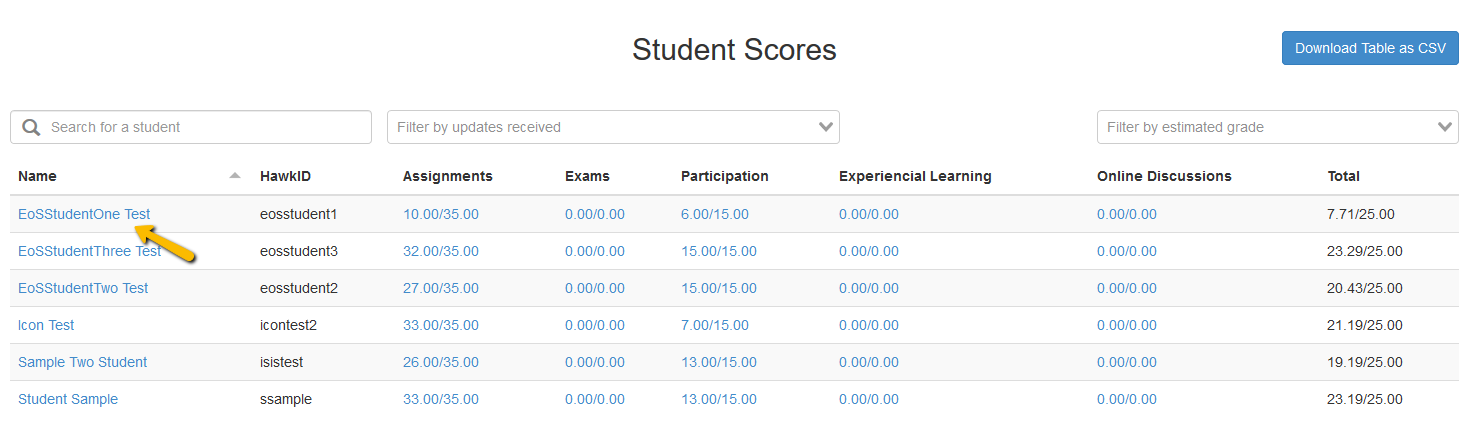
Accessing Student View from Course Dashboard
- You can also go to the Course Dashboard from the three line menu and scroll down to Student Scores.
- Click a student's name to see what they see in Elements of Success.
- To leave student view, use the three line menu to navigate to another page of Elements of Success.
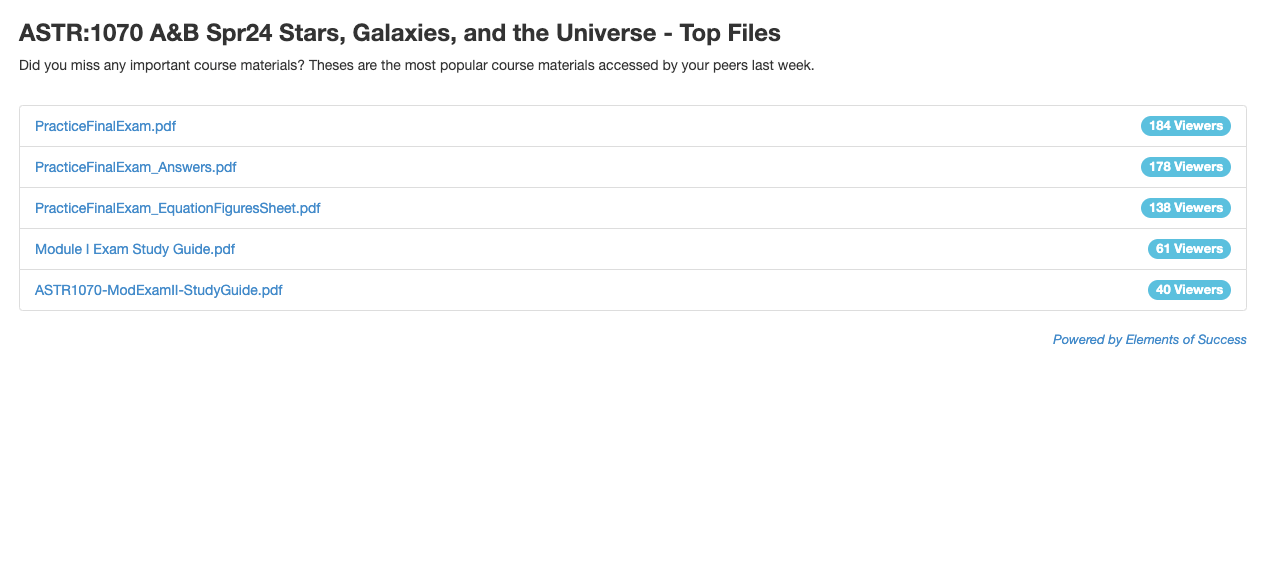
How do I access Top Files?
Top Files is a program powered by Elements of Success that shows the top five course files viewed by students in that class over the last week.
To access Top Files:
- In the menu to the left of your ICON course, click on Elements of Success, Files or Modules.
Click on Top Files on the top right.
You will be able to see the top five files accessed in the last week, as well as which ones you've visited. You can click on the file name to access it.