Alternative text is metadata added to an image that is not visible on the page but interacts with assistive technology tools such as screen readers or e-braille devices. According to the World Wide Web Consortium (W3C), the organization that determines guidelines for digital accessibility, alt text should be the most concise description possible of the image's purpose. When writing your alt text, you'll want to ask yourself the question: what meaning is being made with this image? Why am I using it? And what should my students be getting out of it?
Alternative text is an important part of your site's digital accessibility. There are two ways to add alt text to images in your course site; however, there are minor differences between the two. Please see the two sections below to understand the differences between them:
Adding alternative text directly using ICON's Rich Content Editor
Adding alt text using ICON's built-in image options makes that alt text durable and copy from course to course. To add alt text in ICON's Rich Content Editor:
Once the image is in your page, assignment, etc. left click on the image and the Image Options button will appear under the image:

The Image Options menu will appear on the right-hand side of your screen. Here, you can write alternative text that is appropriate for the image, or in the case of a purely decorative image, can check the box to mark it as such.
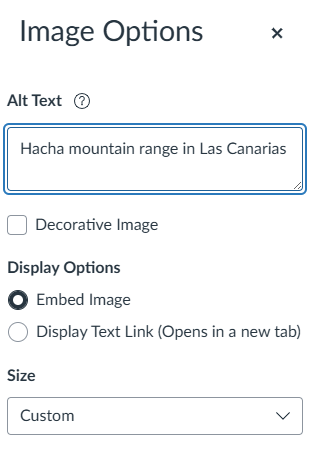
- Make sure to save any changes made to the image options and save the changes to the RCE item (e.g. page, assignment) as well.
Adding alternative text using the Ally tool
Adding alternative text using the contextual menu Ally provides can be quicker than adding things directly in the ICON page, but this alt text does not follow the image when it is copied into another course. To add alt text with the Ally tool:
Hover over the gauge in the corner of the image to which you need to add alt text. The pop-up indicator will appear as you hover over the gauge.
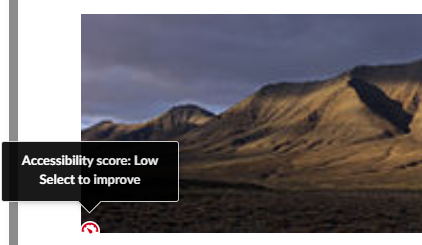
Click on the gauge and add any appropriate alt text into the box in the contextual menu that appears. Alternatively, you can indicate that the image is decorative by clicking the button.
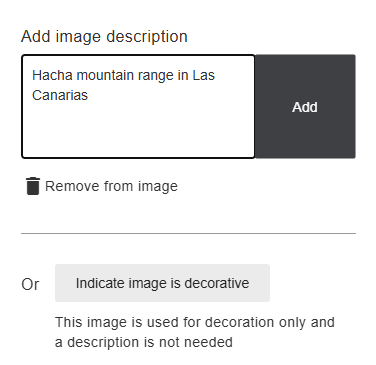
- Close the contextual menu and the alt text will be applied.
Which method for adding alternative text is better to use?
While both methods will work for the current course site in which you are adding that alternative text, we recommend using the ICON built-in tool and not the Ally tool to add the alternative text. Any alt text added with the Ally tool will not transfer during a course copy and will need to be manually added again. Conversely, alt text added directly to the image using ICON's Rich Content Editor will follow the image to any other course site it's copied into.
For more information about alt text best practices, please see our alt text page on the university's Accessibility site. See also this decision tree about how to determine what, if any, alt text is appropriate for the images in your course site.